Wednesday, September 30, 2009

First Decorated Cake

Last week I made plans, cake decorating plans. With Zoe's birthday party coming up very shortly I needed to practice my cake decorating skills to make sure that I can manage the vision I have in my mind. So last week I planned out a special cake to practice all the techniques I will need for Zoe's cake. On Sunday when I baked the Violet Crumble cupcakes I also baked a 6" chocolate cake, wrapped it up and popped into the freezer so that it would be ready to go.

Then on Monday night once little miss Z went to bed I cracked open the fondant and got busy!


May I present to you Clive - The Red Deer. I used modeling fondant to make a model of Clive and at first it freaked me out because the fondant dries so quickly, but by the end of it I was definitely having fun.

On Tuesday I got the cake out of the freezer so it could defrost. I then made up a batch of vanilla Swiss meringue butter cream and filled and coated the cake. Then I popped the cake into the fridge to set. Later that night once little miss Z went to bed I covered the cake in fondant and did a little decoration, to end up with this...


My very first fondant covered cake and fondant sculpture. Now I know that it is by no means perfect, but isn't it just so cute?!


I especially enjoyed putting the polka dots around the side of cake and rolling up those little balls of fondant - that was fun!


And in case you are wondering I needed long pieces of wire to hold up Clive's antlers they go from the tip of the antlers right down through his head - poor Clive!


Since this cake is just a practice run I thought it would best if I got a sliced photo, you know - for you, the readers.


And now that it is sliced I better try some... yummy!

Now that I kind of know what I am doing with this - next time I will take in progress shots for y'all!

Monday, September 28, 2009

Baking Mondays - V is for Violet Crumble Cupcakes (and cake)

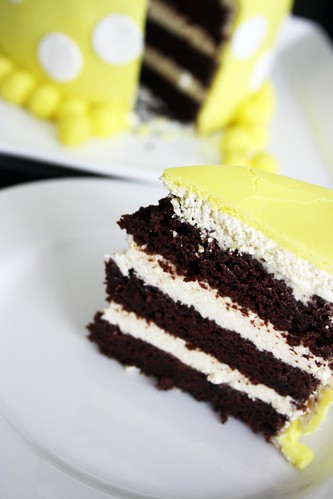
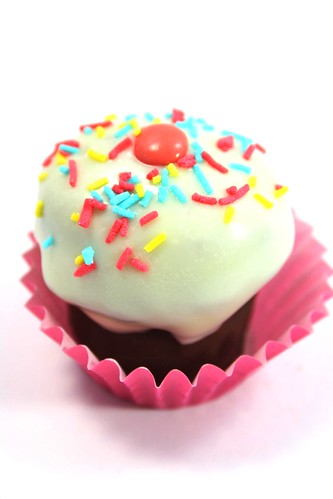
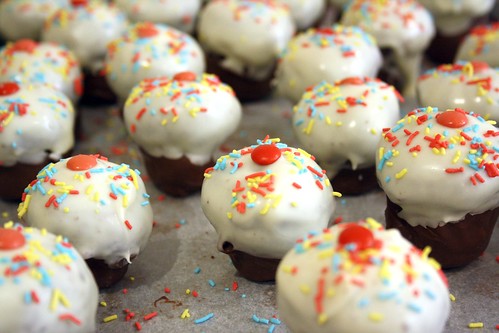
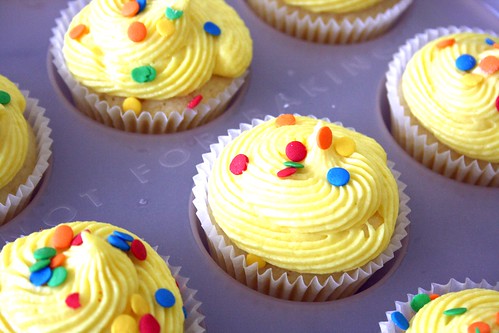
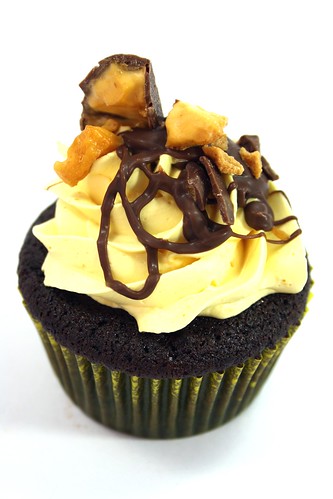
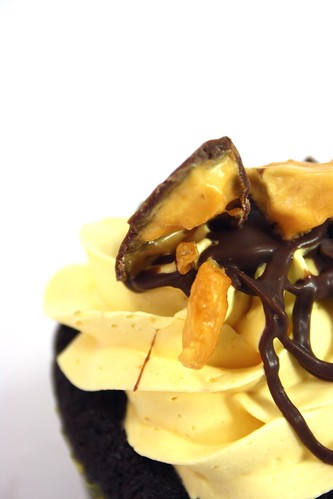
Chocolate cake topped with honey Swiss meringue butter cream and drizzled with milk chocolate, finally finished with Violet Crumble crumbs.

Violet Crumble won in a land slide last week and really did that surprise anyone? Why have a boring vanilla cupcake or a vegan cupcake when you can have a Violet Crumble one?

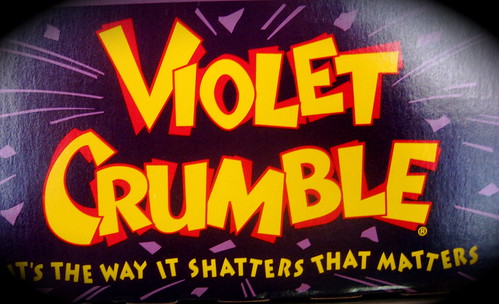
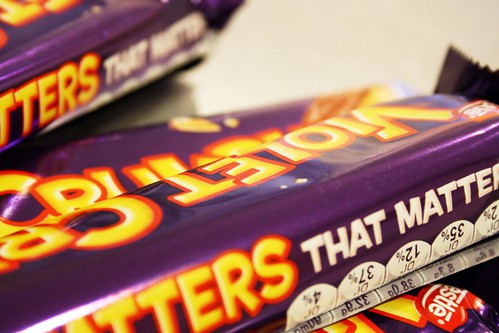
For anyone out there that doesn't know what a Violet Crumble is, just think of a Crunchie - it is very similar but a bit tougher on the teeth - because after all "it is the shatter that matters" supposedly.


Now before we go on you should be warned that this is a story of a baking day with multiple mishaps. I believe in being an honest food blogger, so when I have failures I want you to know all about it. First mishap was thinking that adding crumbled Violet Crumble to chocolate cake batter was a good idea - just warning you now!

Chocolate Cupcakes with Violet Crumble (adapted from Confetti Cakes for Kids by Elisa Strauss)
Makes 24 cupcakes

340g plain flour
113g cocoa powder
12g baking powder
16g tsp baking soda
1/2 tsp salt
227g sour cream
4 tsp vanilla extract
227g unsalted butter
7 ounces caster sugar
2 eggs
1 1/4 cups strong prepared coffee
150g crumbled Violet Crumbles (I bashed mine with a rolling pin - good for anger management)
  1. Preheat the oven to 180C and line two 12-hole muffin tray with cupcake liners.
  2. In a large bowl, sift together the flour, cocoa, baking powder, baking soda and salt.
  3. In a separate bowl, combine the sour cream and vanilla extract.
  4. In a bowl of a standing mixer fitted with a paddle attachment, combine the butter and sugar and beat on medium speed until smooth.
  5. Set the mixer to low speed add the egg and then scrape down the sides.
  6. Alternately add the flour and sour cream mixtures to the butter mixture in 2 batches, starting and ending with the flour mixture. Scrape down the bowl after each addition.
  7. Gradually pour in the coffee. Scrape down the bowl and beat until combined.
  8. Add the Violet Crumble to the mixture and stir to combine.
  9. Divide batter among the muffin holes and bake in oven for 20-25 minutes.

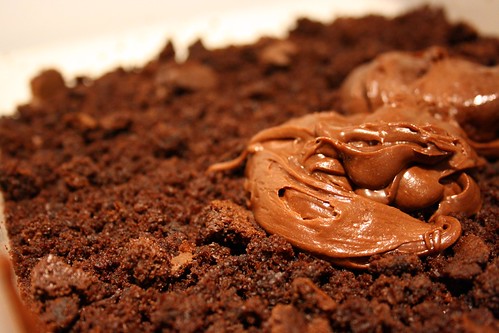
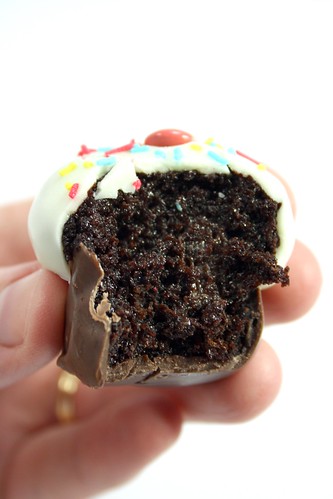
Okay so this is why you shouldn't add Violet Crumble to your cupcake batter...


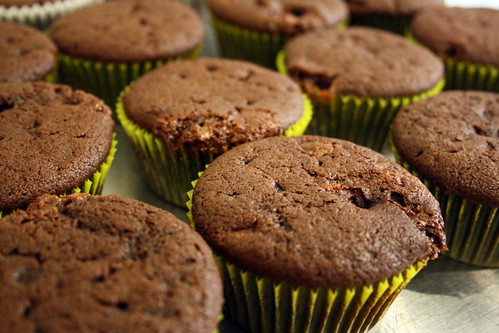
Do you see all of those craters in my cupcakes? That is where a bit of Violet Crumble was near the surface and caused a bit of craziness. Apart from the unattractive craters on top of the cupcakes, in the rest of the cupcake there was no sign of any Violet Crumble, it totally disintegrated (which makes sense in hindsight). So there you go people, do not add Violet Crumble to your cupcakes!

Okay next step in making the cupcakes was the...

Honey Swiss Meringue Butter Cream

270g caster sugar
4 egg whites
250g unsalted butter, softened
1/3 cup honey
Yellow food colouring

Follow the directions for Almond Swiss Meringue Butter Cream, but omit the vanilla and almond and instead add the honey and enough yellow food colouring to get a nice soft yellow colour.

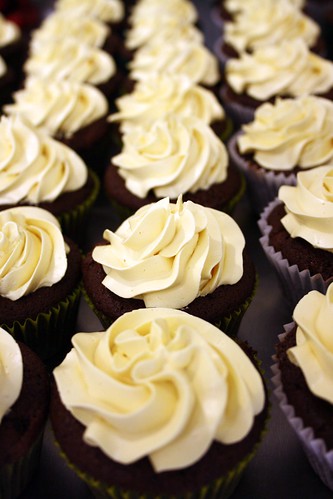
Next I used my lovely new 1M tip to pipe a swirl onto each cupcake, don't they look pretty...


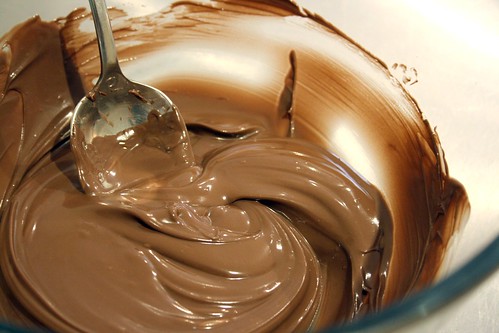
To finish the cupcakes crush 2 king size Violet Crumbles (again time for some anger management with the rolling pin) and melt 100g milk chocolate. Once the chocolate has cooled slightly drizzle some chocolate over each cupcake, then top each cupcake with some of the Violet Crumble crumbs.

Now they are looking delicious...


Now a word to the wise - don't leave these cupcakes for very long before consuming because if you do this will happen to you...

Do you see that Violet Crumble? It ain't shattering anymore! It went all gooey because I left it for too long (as in overnight). So these cupcakes are a bake and take on the same day kind of thang. Okay? Right.

Continuing on the full disclosure path I need to tell you my last baking mishap. I doubled this batch of cupcakes so I ended up getting 36 cupcakes, a 6 inch cake and this lovely number...


Yes I was very impatient and tried to move it from the cake rack before it was cooled. It broke in half. So when your recipe says to leave it on the rack until it has completely cooled please do so, otherwise you will have to do the dodgy like me...


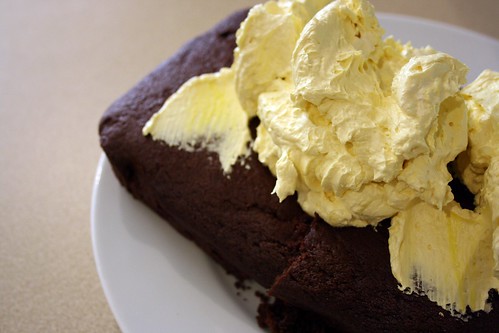
That's better. Swiss meringue butter cream fixes everything.


The ratings?

Me - 6/10, cake is good - except for the silly crumbled Violet Crumble. The SMBC is yummy! Melted gooey Violet Crumble is no fun for anyone.
Mat - 8/10, cake was a bit crumbly, still great though.

Sunday, September 27, 2009

Saturday, September 26, 2009

Giveaway Winner


Thanks everyone for entering the cute.n.boot giveaway. To decide the winner I used random.org (since Zoe is napping and currently unable to select the winner) and the winner is...

minishoes1

Congratulations! I have already sent you an email to get your post address.

Friday, September 25, 2009

Happiness!


I won challenge number 16 from Blog This! Thanks to all who voted for me, it seems there are a few people out there that can't live without sugar ;)

And the winner is...

Image by matt.ohara


Violet Crumble

Tune in on Monday to see the Violet Crumble creations - I'm looking forward to this one!

Flickr Friday - Glitter

1. glitter lips, 2. Moma Glitters, 3. all that glitters, 4. glitter rainbow, 5. Color, Glitter and Bokeh, 6. Glitter, 7. Glitter and drop, 8. maple glitter, 9. Glitter / Brillo

Hope there is a bit of glitter in your day today! Have a great weekend everyone :)

Thursday, September 24, 2009

Choc Chip Cookies


You may find this hard to believe but sometimes I actually bake something that is not a cupcake. I mean cupcakes are great and all, but a girl needs some variation in her life. So a while back I baked some yummy chocolate chip cookies. To me these cookies were perfection - soft texture, slightly chewy, lots of chocolate chips and some walnuts for a bit of crunch. So if that sounds like your idea of a good choc chip cookie then read on...

Ultimate Chocolate Chip Cookies (Bringing Home the Baking by Quincella C. Geiger)
Makes 48 - 72 cookies depending on scoop size

2 1/2 cups plain flour
1 tsp bi-carb soda
1/2 tsp salt
1 cup unsalted butter, softened
1 cup packed brown sugar
3/4 cup caster sugar
2 eggs
1 tbsp vanilla extract
1 cup milk chocolate chips
1 cup white chocolate chips
1 cup dark chocolate chips (I replaced this with more milk/white chocolate chips)
1/2 cup chopped walnuts or pecans (I used walnuts)
  1. Preheat oven to 180C.
  2. Combine flour, bi-carb and salt in a medium bowl.
  3. Beat butter and sugar in a large bowl until light and fluffy. Beat in eggs and vanilla. Add flour mixture to butter mixture; mix on low speed until well blended. Stir in chips and walnuts.
  4. Measure dough with a cookie/ice-cream scoop and place on baking paper lined baking trays. Bake 10 to 12 minutes or until edges are golden brown. Leave cookies on trays until completely cooled.

Wednesday, September 23, 2009

More goodies...

I know, I know I am getting lots of fun stuff lately - but this is definitely the last of it for a while. I ordered from Little Betsy Baker, and may I just say that their shop and customer service is outstanding! I was very impressed. First of all it came wrapped up very pretty like this...


And then inside my lovely little presents...


My fondant modeling tools, a cute little butterfly cutter, a 1M tip for my cupcakes (can you believe I don't have one of those yet!) and a yummy gingerbread was in there as well!

So thank you Little Betsy Baker, Zoe and I appreciated the sweet freebie :)

Monday, September 21, 2009

Baking Mondays - U is for Uncupcake - or Cupcake Pops!

If you like to bake and you like to blog then there is no doubt that you have heard about Bakerella. Bakerella makes the cutest baked goods in the history of sweet things and she is especially renowned for her cupcake pops. It has always been on my list of things to do and I thought the 'U'ncupcake week would be perfect for it, since really it isn't a cupcake is it?

So here is what you need...

A box of cake mix (I used chocolate cake)
Enough frosting to make a mushy cake truffle mixture
180g milk chocolate
180g white chocolate
sprinkles
mini m&ms

Okay, so first you need to bake your box cake according to the directions on the box. Then once the cake has completely cooled you crumble it up and add enough frosting until it brings all the cake crumbs together. I used the frosting that came with the cake mix and then I quickly made up some more buttercream (65g of unsalted butter, 250g of icing sugar and a splash of milk).


Once you have the frosting/cake mixture ready you need to roll it into balls (about 1.5" wide). Place each ball on a baking tray lined with baking paper. Then once they are all rolled, cover the tray with cling wrap and place them in the freezer for about 20 minutes to firm up. To shape them I rolled them into a cylinder then squished the bottom half to make the stub of the cupcake, then flattened out the top to make the top of the cupcake.

See, like this...


Now pop them back into the freezer for another 20 minutes. Next melt your milk chocolate either using a double boiler or the microwave.


Now dip the bottom of each cupcake pop into the melted chocolate and place it back on to the baking tray. Once they are all dipped pop them into the fridge while you prepare for the next step.


Now melt your white chocolate either in a double boiler or in the microwave.


While you are at it get your sprinkles and m&ms ready.


Now dip the top of each cupcake pop in the white chocolate, place a mini m&m on the top and then sprinkle with sprinkles. Leave to set and then place in mini cupcake paper cases.


Now have a bite, you definitely deserve it after all that work

The ratings?

Me - 10/10 - yum, yum, yum - and cute overload!
Mat - 10/10 - absolutely perfect!

Giveaway with cute.n.boot


Isn't this a pleasant surprise for a Monday afternoon, the lovely Katie from cute.n.boot is sponsoring a giveaway for us today.

Cute.n.boot has all your pen paling needs. The perfect shop for those who adore sending letters & mail to friends & family. All the stationery is handcrafted, and larger prints are available for each design.

You can find out more about Katie and cute.n.boot by visiting her lovely Etsy store or her blog.

Up for grabs is a lovely collection of 5 card and envelope sets handpicked for any vintage lover - a typewriter, phonograph, telephone, Polaroid and an 'OH SNAP! Camera' card. Valued at $10 USD.


Also included is four pint size booklets perfect for the writer and artist on the go. Valued at $7 USD.


You can enter up to 4 times! Here is how:
  1. Visit the cute.n.boot Etsy shop, then come back here and leave a comment telling me what your favourite item is.
  2. Become a follower of The Red Deer (if you already are a follower, you get a second entry automatically).
  3. Blog about this giveaway, and leave a comment telling me that you blogged it.
  4. Tweet about the giveaway, and leave a comment telling me that you tweeted it.
Entries will close at 12pm on the 26th of September - Adelaide time! So get commenting!

Sunday, September 20, 2009

Giveaway Winner

Thanks for all your entries - now it is time to declare the winner!

I put all the entries in a bowl...


Zoe came to inspect...


Drawing the winner...


And the winner is...


Congratulations Virginia from mum/toddler/babe! If you can email your address to alicia@thereddeer.com we will get the package off to you.


In Zoe's eyes you were all winners ;)

Saturday, September 19, 2009

First cupcake order


Today I baked my first ever cupcake order! One of the lovely ladies from Mat's work wanted some cupcakes for her daughter's 10th birthday party - and I was ever so happy that she asked me to bake them. The birthday girl wanted vanilla cupcakes with vanilla buttercream and sprinkles. The colour choices were left up to me, so I decided to do 12 yellow cupcakes with coloured sugar confetti and 12 pink cupcakes with sprinkles.

The pink ones are my personal favourite - they look so pretty...


I really like the look of the sugar confetti, especially on yellow frosting - classic cupcake style!


Here they are all packed up in my cupcake courier ready to go...


I hope the birthday girl liked them :)

Friday, September 18, 2009

Thursday, September 17, 2009

Playing...

I've been playing with the blog layout tonight. Let me know if you have any issues with any of it :)

Happy 11 Months Zoe!


Zoe is 11 months old today, it is really hard to believe that in one short month she will be 1 year old! Where has all that time gone?

This past month has been a good one Zoe is getting a lot more vocal - she is now saying dada, nanna, mumma (rarely though), ya ya and bubba. Her favourite at the moment though is definitely nanna - very cute! She is starting to get a good head of hair, which looks just adorable and she has also got 8 teeth now - and they really hurt when she bites, ouch!


Zoe has become obsessed with standing as much as possible. Most of the time she is holding onto something, but increasingly she is standing unsupported which is pretty cool. Most of her days are spent playing with pegs (best toys ever by the way), reading books, dancing in the lounge room, talking and waving to mummy and "helping" mummy around the house. By helping I mean she pulls all of the wet washing out of the wash basket and on to the floor, pulls out all of our DVDs and helps rearrange my tupperware cupboard - yep that is my little helper.


One of the best things of all is how much Zoe loves to give nice big open mouth kisses - mummy and daddy can't get enough of them! I also adore the giggles when I chase her around the house and tickle her tummy.

Love you baby girl!