Friday, October 30, 2009

Cornflake Cookies


Have you had a really good cornflake cookie before? You know the ones - the right amount of crunch from the cornflakes, the right amount of chew from the cookie dough and the right amount of sweetness from the sultanas. Well this recipe did not produce those cookies. Dang it. There were way too many cornflakes so the cookies were almost impossible to put together. In fact a lot of them fell apart after been baked.
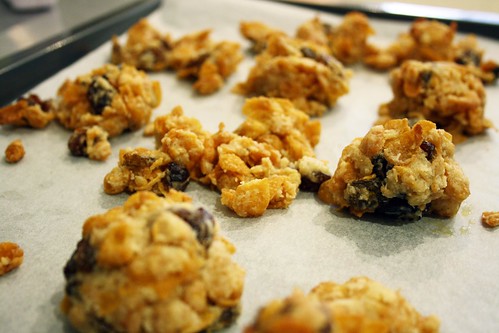

Total disaster.

Have you got a tried and true recipe for cornflake cookies? I would love to steal it if you do, so please let me know.

For now here is my dodgy recipe...

Cornflake Sultana Cookies (from The Australian Women's Weekly Basic Cookbook)
Makes about 25

5 cups cornflakes
1 cup coconut (desiccated)
1/2 cup brown sugar
1 cup sultanas (I used raisins)
1 cup self-raising flour
185g butter, melted
2 eggs, lightly beaten
  1. Combine cornflakes, coconut, sugar, sultanas and sifted flour in large bowl.
  2. Stir in butter and eggs gently with a wooden spoon.
  3. Shape rounded tablespoons of mixture into balls (yeah right, that was nearly impossible).
  4. Place balls about 5cm apart on greased oven trays.
  5. Bake at 180C for about 10 minutes, or until lightly browned.
  6. Stand cookies for 3 minutes before cooling on a wire rack.

And the winner is...

Image by feridem

Zebra cake

Tune in on Monday to see the final creation in my A...B...Cupcakes project!

Wednesday, October 28, 2009

Banana and Caramel Cake

I have been a bad blogger, I forgot to announce to the world on Saturday that it was Mat's birthday! And not only was it Mat's birthday but on that very same day it was our 6 year anniversary. Yep six wonderful years together and it feels like it has all just flown by. To celebrate this fantastic day I baked Mat a banana and caramel cake. I actually read through a whole heap of cake descriptions to see his reactions - mostly it was no, no, no - but then a yes! Yes he likes banana cake and so it was made.


Banana Caramel Layer Cake (from The Australian Women's Weekly Classic Cakes)
Makes a 24cm bundt cake
(I made a 6" cake and 12 cupcakes instead)

185g butter, softened
175g caster sugar
3 eggs
335g self-raising flour
1/2 tsp bicarbonate of soda
1 1/4 cups mashed banana (I needed 4 bananas)
1/3 cup milk
380g can caramel Top'n'fill (I used half a tin)
3/4 cup thickened cream, whipped
1 large banana sliced thinly (I omitted this)
  1. Preheat oven to 180C. Grease 24cm bundt pan well (or grease and line a 6" round cake tin, and line a 12-hole muffin tray with cupcake liners).
  2. Beat butter and sugar until light and fluffy. Beat in eggs, one at a time.
  3. Stir in the sifted dry ingredients, mashed banana and milk.
  4. Spread mixture into bundt pan (or cake tin and cupcake liners).
  5. Bake for 40 minutes (took my cupcakes 20 minutes and my 6" cake 30 minutes).
  6. Stand cake in pan for 5 minutes before turning onto a wire rack to cool.
  7. Split cake into three layers. Spread bottom layer of cake with half the caramel, top with half the cream then half the banana slices. Repeat next layer. Replace top of cake and dust with icing sugar to serve. (I only split my cake into two layers and I left out the banana slices because I didn't want them to go brown).


Happy birthday and 6 year anniversary Mat - love you!

Monday, October 26, 2009

Y is lemon 'Y'oghurt Cupcakes

Lemon yoghurt cake topped with blueberry swiss meringue buttercream

What comes to mind when you think of yoghurt? To me it is instantly berries - delicious, fantastic berries. When yoghurt won the poll I knew straight away that I wanted to incorporate berries into the cupcakes somehow. But then I remembered the waffle cupcakes, they had blueberries in the cake and I only made them a short while ago. So I decided that the cake portion of these cupcakes would have to have a different flavour, something that goes well with berries. And that my friends is how I decided upon lemon yoghurt cupcakes.


Lemon Yoghurt Cupcakes (from Best Recipes)
Makes approximately 24 cupcakes

1 3/4 cups caster sugar
2 eggs
1/2 tsp salt
2-3 tsp lemon juice (I used 3)
Grated zest of 2 lemons
3/4 cup oil (I used vegetable oil)
1 cup natural yoghurt (I used low-fat)
2 cups self-raising flour
  1. Preheat oven to 180 C and line 2 12-hole muffin trays with cupcake cases.
  2. In a bowl mix sugar, eggs, salt, juice, zest and oil with a fork.
  3. Add remaining ingredients and combine well.
  4. Bake for 20 minutes or until a toothpick inserted comes out clean.


Now seen as I had some frozen blueberries left over from the previously made waffle cupcakes I decided that the buttercream would be blueberry flavoured, so....

Blueberry Swiss Meringue Buttercream

4 egg whites
270g caster sugar
250g unsalted butter
500g blueberries, pureed
  1. Follow the directions for Almond SMBC but replace the vanilla and almond with the pureed blueberries.
  2. Once the cupcake have cooled pipe a swirl of the SMBC onto each cupcake.
Doesn't it look pretty...


And just for a bit of fun I thought I would show you my miniature photography set up today. Normally I have a big light box out but I couldn't be bothered moving it. So a piece of paper and three lamps seemed to work quite nicely.


The ratings?

Me - 7/10 - I love the blueberry SMBC but the cake was a bit dense/too moist for me. Still yummy though :)
Mat - 7/10 - it was good but he is over lemon.

Sunday, October 25, 2009

That Vintage Giveaway Winner

Thank you all for participating in the That Vintage giveaway - but of course there can only be one winner, and that one lucky reader is (according to random.org)...

Rose

Congratulations Rose! I will be sending you an email shortly.

Friday, October 23, 2009

If you like pina coladas...


Pineapple cake topped with Pina Colada buttercream and shredded coconut

Have you heard that Iron Cupcake is back? Another reason to bake some cupcake delights! To kickstart the second year of Iron Cupcake we have an interesting challenge - the theme this time was music. So of course I started to rack my brain for cupcake worthy songs, and I came up with... If You Like Pina Coladas!

So if you in fact do like Pina Coladas may I suggest that you try out these cupcakes, especially the buttercream (drool).

Pineapple Cupcakes (adapted from Planet Cake)
Makes 12

175g unsalted butter, softened
160g caster sugar
1 tsp natural vanilla extract
1 tsp grated lemon zest
2 eggs
160g self-raising flour
100g plain flour
200ml milk
440g tin of crushed pineapple, well drained (reserve the juice for the buttercream)
1/4 cup desiccated coconut
1/3 cup honey
50g unsalted butter, extra
  1. Preheat the oven to 180C and line 2 12-hole muffin trays with paper cases.
  2. Beat butter, sugar, vanilla, lemon zest and a pinch of salt until pale and fluffy. Add the eggs one at a time, beating well after each addition.
  3. Sift the flours together. Using a wooden spoon, fold the flour and milk alternately into the creamed mixture.
  4. Spoon mixture into the paper cases. Top each cupcake with crushed pineapple and a sprinkle of coconut.
  5. Beat the extra butter with the honey until creamy. Spoon some of the honey mixture over each cupcake - not too much!
  6. Bake for 20-25 minutes or until a toothpick comes out clean.
  7. Leave in tray for 5 minutes and then transfer to wire racks to cool.


Pina Colada Buttercream

160g cream cheese, softened
60g unsalted butter, softened
500g icing sugar, sifted
2 tsp coconut essence
2 tsp pineapple juice
  1. Beat the cream cheese and butter until creamy.
  2. Add the icing sugar, coconut essence and pineapple juice and beat until combined.


To assemble the cupcakes top each with a swirl of the buttercream, then flatten out the frosting and roll it in some shredded coconut. Decorate with a bendy straw and cocktail umbrella.


Our Generous IronCupcake:Earth Prize Providers:

And check out Iron Cupcake Earth - it really is a lot of fun!

Wednesday, October 21, 2009

Zoe's 1st Birthday Party


Last Saturday was Zoe's first birthday and it was such a fantastic day. We had friends and family over for a relaxed barbecue and some Beatles Rock Band later in the night. Zoe was brilliant all day long, she even hung out in the shed with the boys to dance and sing to Rock Band - so cute!

And of course you know there was cake...


I made 24 chocolate cupcakes and 24 vanilla cupcakes, each cupcake was topped with orange coloured vanilla butter cream and then topped with a green or blue fondant star.


I even made a little cupcake tower using this great tutorial from Cake Journal - it was pretty easy to do and it looked great. I definitely recommend it if you have a particular colour theme you are trying to follow for a party.


Then of the course there was the cake, a 6" chocolate cake filled with vanilla Swiss meringue butter cream then covered in fondant and topped with a fondant replica of Zoe's favourite toy - Eric the Elephant.


A little close-up of Eric - he was a lot of fun to make!


Cupcake time for Zoe - we lit a candle for her and sang happy birthday. I thought she was going to freak out but she loved all the attention!


Then once the candle was blown out (thanks to me) she had a little taste of the butter cream.


Zoe then continued to destroy the rest of the cupcake - she loved it!


And the all important sliced cake photo - I love those yummy looking layers!


This is Zoe very smily and happy with her grandma.


Zoe opening presents at the end of the night after a quick nap.


After a big day, Zoe gave her new toy puppy a big hug and then went to sleep.

Can't wait for the next birthday party :)

Tuesday, October 20, 2009

New Member of The Cake Slice Bakers


You heard me right, I am one of the new members of The Cake Slice Bakers and I must say I am a little bit excited. Why am I excited you may ask? Well good friends there are a number of reasons:
  1. I get to bake something that is not a cupcake for a change.
  2. I 'needed' to buy a new cook book to bake from for the next year (Southern Cakes by Nancie McDermott).
  3. I am now part of an elite group of bakers.
Yes I am excited.

The first cake that was chosen from the new book was the Cinnamon Pecan Coffee Cake. Now at first I must admit I wasn't very excited about this because I thought that meant that there was actually going to be coffee in the cake. You see I can't stand coffee or anything coffee flavoured - I am a cup of tea kinda gal. After reading the recipe however I was pleasantly surprised to find that there was in fact no coffee in the cake, and instead it is simply a cake that is to be eaten with coffee - yay! So after my absolutely mad weekend (with Zoe's 1st birthday) I baked up this lovely, lovely cake. The cinnamon aroma that comes out of the oven as you bake this cake is just heavenly and the cake itself a lovely balance of light cake with crunchy pecans and chewy raisins. I loved this cake, especially with a drizzle of thickened cream.

Oh and if you are wondering why my cake looks a little dark - let me just say that I won't be trusting Mat to get my cake out of the oven from now on :P


Cinnamon Pecan Coffee Cake
(from Southern Cakes)
Makes a 13"x9" cake

For the Cake:

3 cups plain flour
1 tbsp baking powder
1 tsp salt
1 tsp vanilla extract
1 cup milk
1 cup unsalted butter, softened
1 cup sugar
2 eggs

For the Filling:

1½ cups brown sugar
3 tbsp plain flour
3 tbsp cinnamon
1½ cups raisins
1½ cups coarsely chopped pecans
¾ cup unsalted butter, melted
  1. Heat the oven to 180C. Grease and flour a 13 by 9 inch pan.
  2. To make the filling, combine the light brown sugar, flour and cinnamon in a bowl and stir with a fork to mix everything well. Combine the raisins and pecans in another bowl and toss to mix them. Place the cinnamon mixture, nut mixture and melted butter by the baking pan to use later.
  3. To make the cake batter, combine the flour, baking powder and salt in a bowl. Stir the vanilla into the milk. In a large bowl combine the butter and sugar and beat with a mixer on high speed until pale yellow and evenly mixed, about 2 minutes. Scrape down the bowl to ensure a good mix. Add the eggs and beat for another 2 minutes, scraping down the bowl now and then, until the mixture is smooth and light.
  4. Use a large spoon or spatula to add about a third of the flour mixture to the butter mixture and stir only until the flour disappears. Add a third of the milk and mix in. Repeat twice more until all the flour and milk mixtures have been incorporated. Stir just enough to keep the batter smooth.
  5. Spread half the batter evenly into the prepared pan. Sprinkle half the cinnamon mixture over the batter followed by half the melted butter. Scatter half the raisins and nuts over the top. Spread the remaining batter carefully over the filling, using a spatula to smooth the batter all the way to the edges of the pan. Top with the leftover cinnamon, butter and nut mixture, covering the cake evenly.
  6. Bake for 45 to 50 minutes, until the cake is golden brown, fragrant and beginning to pull away from the edges of the pan. Place the pan on a wire rack and allow to cool in the pan for 5 to 10 minutes before serving in squares right from the pan. The cake is delicious hot, warm or at room temperature.

Sunday, October 18, 2009

Cupcake Hero voting is open


Cupcake Hero voting is open!

There are a lot of really good entries this month - but how can you not vote for a severed finger?

You can vote here, so what are you waiting for?

Friday, October 16, 2009

Giveaway with That Vintage


Are you ready for another fantastic giveaway? This week the lovely Sophie from That Vintage is giving one lucky reader of The Red Deer a fantastic prize. Here is a little snippet about Sophie's wonderful Etsy shop...

That Vintage is all about Our Vintage. That Vintage cracked it's own egg in the warm month of February 2008 and fell into the hands of Sophie Hill, a Launceston based bird-obsessive artist and lover of all things handmade. That Vintage pieces are created using a delightful range of fabrics sourced from around the world, and the beautiful timbers that Tasmania has to offer in our own backyard. They are made with love and really, that is all that's needed.

You can find out more about Sophie and That Vintage by visiting her lovely Etsy store or her blog.
Sophie is giving away these gorgeous Apple earrings (19mm fabric covered). These are so funky and bright! Crispy, crunchy - oh so yum!

If you would like to win this fantastic prize here is how you can enter...
  1. Visit the That Vintage shop, then come back here and leave a comment telling me what your favourite item is.
  2. Become a follower of The Red Deer (if you already are a follower, you get a second entry automatically, just let me know that you are a follower in a comment).
  3. Blog about this giveaway, and leave a comment telling me that you blogged it.
  4. Tweet about the giveaway, and leave a comment telling me that you tweeted it.

Entries will close at 12pm on the 24th of October (UTC/GMT +10:30 hours). So get commenting!

Happy 1st Birthday Zoe!


You've come along way baby girl - mummy and daddy love you very much!


We are looking forward to many more wonderful years with you.

Love + 1

Thursday, October 15, 2009

And the winner is...

Yogurt

With Zoe's party on this weekend I won't be making these just yet - but in a week and a half time you can tune in to see the yummy cupcake creations!

Sprout Head Giveaway Winner


Thank you all for participating in the Sprout Head giveaway - but of course there can only be one winner, and that one lucky reader is (according to random.org)...

Deb - Two Cheeky Monkeys

Congratulations Deb! I will be sending you an email shortly.

Tune in on Sunday for another fantastic giveaway!

Flickr Favourites - Party


1. Princess Party, 2. Childrens' Parties, 3. 74.365 - Party Time!, 4. flickr.com/photos/44973368@N00/2814909938/, 5. Party time! / Tiempo de Fiestas, 6. Vons, party cupcakes 4 days later (2), 7. Join the party!, 8. Party Time v2, 9. What A Party!

Party Bag Fun

This week I have been a very busy girl preparing for Zoe's first birthday party on Saturday. We are having a small shindig at our place - just a BBQ, some salads and of course cake! We do however have 10 or so kids coming along so I thought I should do the right thing and make up some loot bags - after all it is one of the best bits about birthday parties.


I found some wedding cake bags at a local shop and decided I would use them for the bags, I then got some coloured paper (orange, blue and green - the theme for the party) traced out lots of circles and stars, cut out all the shapes and created my bags. I think they look quite cute.


Next I got totally OCD (obsessive compulsive disorder) like and bought a whole heap of lollies and then sorted them into blue, green and orange colours. The rest of the colours have gone into a big container for "Halloween" (they are quickly disappearing). Don't they look pretty all sorted?


I also bought some little toys to put in the loot bags - again in the same colours. I got little parachute men, bouncy balls, scary finger puppets, little mazes and erasers that you put on the end of pencils.


Scary!


Here is what the contents of one of the loot bags, however I also put a bubble blower and balloon in each bag after I finished taking photographs. I think it looks awesome altogether.

Very happy with the end product.

Wednesday, October 14, 2009

Getting Organised


I used to think my craft desk looked cool, but I suddenly realised that it just looked plain messy. I had little cane baskets for all my pencils, paint brushes, lino tools, etc, and while it is useful to have everything at arm's reach it just doesn't look very nice and neat. So while at Ikea with my mum, her friend Kristina and little miss Z I was eying off a a little set of stationery drawers for my desk. Since my mum is the bestest mum in the whole wide world she decided to spoil me and buy them for me - thanks mum!

So the next day I decided to tackle the assembly of my little stationery station. I got all the bits out and made sure everything was there first...


So far so good - I was a happy little Ikea lover...


Look don't the pieces look pretty all stacked up together...


So it was all fun and games up until I tried assembling the thing. I might have said a few choice words that shall never be repeated again. I may have thrown some pieces around the room. I might of cried. It might of taken me four breaks from the thing to calm down. I may have bent a few nails...


Lets just say that the happy Ikea gal quickly turned into an angry and frustrated Ikea gal..


But I got there in the end...


And now my stationery is so nice and neat...


I even have a little drawer for my collection of scissors...


And doesn't the cotton look pretty...


So it was worth it in the end, but next time I will wait until Mat gets home and he can handle the assembly.

Alicia + hammer = Disaster.